Photographing Fire Dancers – Part 1

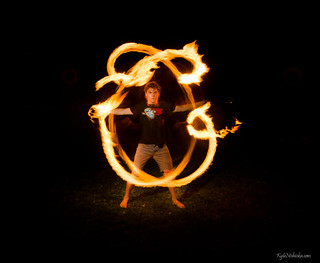
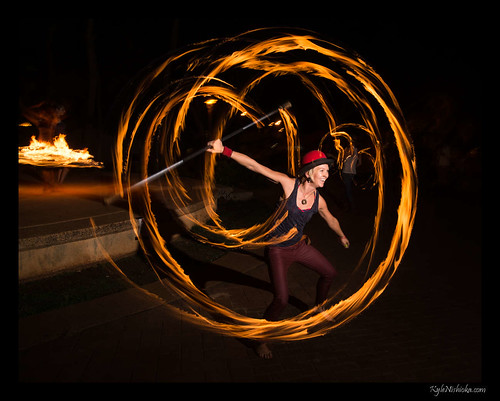
Fire dancers and fire spinning has been my favorite subject to shoot recently. The catch is that fire is a really difficult to photograph. Fire can be really bright (sometimes brighter than fireworks) and blow out the highlights. Tthen the light levels varies up and down throughout the performance. But, the picture would look so much cooler if the fire trails made long, arcing sweeps so lets keep that shutter open just a bit longer. And finally you still want to see the performer’s face right? Here’s some tips on how to make your fire dancer photos look amazing.

Kakaako Fire Jam

Basic tips

  1. Exposure. In a lot of ways, photographing fire artists is like photographing a fire works show. You meter for the brightest part of the image so that you keep the detail in the highlights. Then keep the shutter open for a long exposure to build a long trail of light while also brightening the shadows and dark areas. The typical settings are ISO 100, a variable aperture between f8 to f16, and a shutter speed to suit your situation.
  2. Honolulu Night Market - February 2013

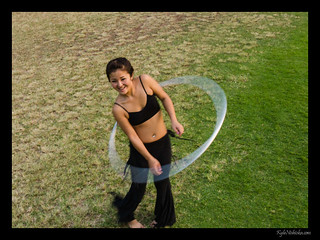
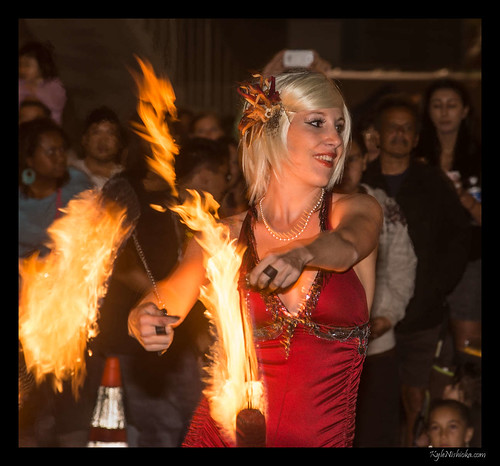
  3. Tripod or handheld? Most people would expect this one to be a no brainer but there are two ways to go with this. Because fire is so bright, and you can stop down to a really stop down to a small aperture, and since fire artists perform at night so the background is naturally dark. This combination allows you to get away with slightly longer handheld shots. And by slightly longer, I mean 1/15 to 1/8 of a second like the above photo of the poi spinner. It’s long enough to get a slight trail of fire and the background should be dark enough to not show any ghosting if you’re careful to avoid putting a street light in the frame. That said, using a tripod is still the best practice.
  4. Fill flash. When the ISO is low and aperture is small, the subject is going to be underexposed in your photo. BTW, the subject of the photo should be the fire artist and not the fire. To balance the exposure of the subject with the fire, you need to add light from a strobe. Unfortunately, you need a lot of light. Typically full power pops from a Nikon SB-900 / Canon 580EX. I’ve also tried zooming in the head of the flash to tighten up the beam as much as possible so that I could use 1/2 power. The distance to the subject is also a big variable for the amount of fill light needed. It’s going to take a bit of trial and error to balance the fill flash. Just don’t use TTL, this is the kind of lighting situation that confuses a camera’s light meter.

Next time I’ll dig into the advanced tips.

Mokuleia Star Trails

Star trails are more fun than time lapse photography in my opinion. Mostly because I like to show the effect of time passing in a single frame. There is something about long exposures and capturing a pattern. When images are strung together into a time lapse video it is easy to appreciate the motion, but it is just as easy to forget it a second later. Here are a few tips To make a memorable star trail photo.

Mokuleia Star Trails

Mokuleia Star Trails 2

    Basic Tips

  1. All of the tips from Night Photography apply to shooting star trails.
  2. When choosing your spot to shoot star trails, you want to have as little light pollution as possible. But, it is not really practical to go far enough away from civilization to eliminate all light pollution. You will inevitably get some glow from a city somewhere on the horizon. Don’t worry so much about that, just concentrate on how many stars you can see with your naked eye. If you can see the milky haze of the Milky Way, your view is more than good enough for star trails.
  3. Shoot your star trails during or around the nights of a new moon. Moonlight is basically light pollution and there’s no where you can go to get away from this source of light pollution.
  4. Wider is better. Capture as large of a pattern as you can with a wide angle lens. Fisheye lenses are especially trippy for these type of photos since you are primarily angling the lens upwards. The distortion enhances the trails.
  5. The north star (Polaris) is practically stationary in star trails since it is almost perfectly aligned with the rotational axis of the Earth. The other stars loop around Polaris and you can use that to your advantage when composing your shot.
  6. Invest in a camera body that has a built-in intervalometer. Or get a remote trigger that has one. And yes, the cheap Chinese ones on Ebay are good enough. One way or another the camera should be set to take the shots on auto-pilot.
  7. Mokuleia Star Trails 3

      Advanced Tips

    1. Cloud cover. So long as passing clouds keep moving through your frame they don’t ruin your star trails photo. Or not as much as you might fear when you are out in the field. The long exposure needed to capture star light thins out the clouds and you still have a largely useful frame. Now if the whole sky stays cloudy, your outing is pretty much a lost cause, but don’t give up after the first big wave of clouds pass by. Now this star trail above had only one thick set of clouds that concerned me. It rolled right through the scene and it looks like a solid cloud bank, but that is just the stitching process smudging the cloud across the frame.
    2. Move and recompose after you’ve gotten about 50 – 75 shots. I know it would be epic to shoot a single sequence spanning the whole night. Then stitch the photos together to make some really long trails. But, if you can’t make this kind of a trip every night, you should make the most of your time by shooting just enough frames to make a decent size trail then move on to the next scene.
    3. The star trails should be the background of your photo, not the subject. If you can find an awesome landscape (or nightscape) that has star trails in it, that will be at least a dozen times better than pointing a lens straight up at the stars.
    4. Learn to focus manually, in the dark, and possibly without live view. You may have heard of the trick where you focus using live view and magnifying the image on the LCD to dial in your focus. But, if the stars are faint, you won’t see them well enough to focus even with live view. Instead look on your lens’s focus ring and find the mark for infinity. Use that as a starting point to fine tune focus if the stars are bright enough to show up on live view.
    5. Be mindful of the wind and the vibration it can cause on your camera & tripod. The lower your camera is to the ground, the better your shots will come out. That, and you can sit on the ground and look through the viewfinder to compose your pics. It’s better than crouching if you had set up the tripod to your standing eye level.
    6. A lot of the finishing touches, not to mention the star trail stacking, is done in post production. Edit your photos before running them through the star trail stacking software. Adjust your exposure, noise reduction, contrast and sharpening prior to processing the star trails.
    7. Once you have the stacked star trails, take the photo back into Photoshop and do some more cleanup. You may possibly want to use just one of the foreground shots from the series to replace the blended foreground that came out of the star trails stack. Composite the foreground on top of the trails and mask away whatever you don’t want to see.

    One last part I almost forgot to mention. The software I used to create the star trails is StarStaX and Startrails. Either of these programs will automatically stack your photos and create the star trails. They are both free programs and do not need Photoshop or any other image editing software to run. StarStaX is cross platform and runs on Windows, Mac & Linux. StarTrails is Windows only.

Bytemarks Lunch at the Pacific Aviation Museum

The fine folks at the Pacific Aviation Museum treated the Bytemarks gang to a lunch and tour of their Ford Island Control Tower as well as the aircraft museum. The Control Tower was used in certain scenes in the movie Pearl Harbor to recreate the attack on December 7th, 1941. The tower itself is a real historic building from World War II and is in the middle of an ongoing restoration effort.

The aircraft in the museum are the real gems of the place. If you happen to be an aviation geek or history buff, I can guarantee that you will not want to pass up a trip to this slice of American history.

Bytemarks Lunch - Pacific Aviation Museum

Bytemarks Lunch - Pacific Aviation Museum

Bytemarks Lunch - Pacific Aviation Museum

Bytemarks Lunch - Pacific Aviation Museum

Full photo set on Flickr.

Night Photography with HICapacity

A local makerspace group, HICapacity held a night photography meetup at Mokuleia on Friday. There’s really only one really good spot for stargazing on Oahu and that’s at the end of Farrington Highway in Mokuleia. There’s so much light pollution in town and even in central Oahu, that you have to go to the farthest part of the north shore to get away from it. I shot a time lapse video of the total lunar eclipse in 2011 from this spot.

HiCapacity Night Photography meetup

Here are a few advanced tips that go a long way to make a good photo of the night time sky.

  1. Beyond the obvious tip of getting a tripod, get low to the ground. This will minimize shaking from the wind and it will let you get a bit more of the ground in the frame even when you are angling your lens upwards. A bean bag (or stuffing your camera bag) will support your camera well enough for the kind of shot you see above. Remember, you want some kind of foreground element to be in your shot to give the picture some context of scale.
  2. Shoot a test frame at the highest ISO that is available on your camera. Then back it down to a noise level you are comfortable with. You should already be shooting with the widest aperture and a very long shutter. Most people will think that they should keep the ISO low to enhance image quality, but the reality is that you will need every bit of light sensitivity from your camera to capture starlight. The photo above was shot at ISO 6400 and I needed every bit of it.
  3. Learn how to operate your camera in the dark. Memorize the location of all the buttons that you need to adjust the exposure. You should also learn how to focus manually, using live view and maximizing the digital zoom of the live view. You want to focus on the stars and get them as sharp as you can.
  4. If you use light painting to show your foreground, you only need to illuminate it for a fraction of the amount of time as the sky. But make sure your foreground doesn’t move even after you turn off the light. In the photo above, I used the LCD backlight from my camera to illuminate me. But I only had the screen on for 5 seconds out of the 30 second exposure. And I still had to hold still after the light went off, otherwise I would be somewhat transparent and the stars directly behind where I’m sitting would start to show through me.
  5. I have some plastic life bracelets and stretched them over the zoom rings on some of my lenses. This is so that I can tell by feel whether I’m touching the focus or zoom rings. The rings on some lenses don’t feel that different from each other when you only use your fingertips. You may dismiss this because you think that you will be able to tell just by holding the lens. But, remember that your camera is on a tripod and not in your hands. You will probably be reaching over the camera or from the side. And you can’t see the lens barrel because it’s dark. When you spend a lot of effort composing, focusing and tweaking everything manually, you really don’t want to mess things up by turning the wrong ring.

So now that you’ve got some additional tools under your belt, check out Dark Sky Finder to find the best viewing area in your neighborhood and plan your next nightscape outing.

Light Painting with LED Hoops

In case you haven’t been keeping up with retro trends, hooping has been making a comeback. Both guys and girls have been picking up PVC tubing and shaping them to their will. Sometimes they add a bit flare to their hoops with strings of LED lights and a controller chip to make them blink and change colors. These hoops can be used to paint with light when shot as a long exposure.

New Year's Eve 2012

There are a few things that you need to know to get a good light-painted photos.

1. LEDs are relatively dim by photography lighting standards. In dark conditions, they stand out pretty well, but they don’t light up the subject in any meaningful way. The LED hoop in the photo above was especially bright. I’d guess it is roughly 1 – 2 stops brighter than the other hoops I’ve photographed. Even so, the subject is lit by a SB-900 from camera left. And notice that you can’t see any ghosting of the subject from the LED lights.

2. To balance the light between LEDs and flash, meter your exposure for the LEDs and add fill flash to light the subject. You only want to add a kiss of light for fill.

3. Generally you do not want to spill light on the background so keep the power level pretty low, take the flash off of the camera and move it close to the subject. If you have a snoot or grid, that will work even better to minimize the spill.

4. Use bulb mode w/ rear curtain (or 2nd curtain) sync to control the start and stop of the capture. It doesn’t really matter when you start the exposure, but you will want to close the shutter before the hoop has made too many revolutions. Rear curtain sync captures the subject at the end of their move.

Above all else, the thing to remember is that the photo should be about the hooper and not the hoop. Try to time the capture so that their face is not obscured by light trails. But don’t let that stop you from experimenting or letting the hooper show off their moves.

New Year’s Eve 2012

This past New Year’s Eve was more fun than I’ve had in years. Firstly, Eat the Street was the perfect fit for a super block party. Kakaako Waterfront Park is the ideal location for a party that size in town. And last but not least, the weather remained dry even when it didn’t look so promising in the afternoon.

New Year’s Eve 2012 photo set on Flickr

Waikiki Halloween 2012

Just got back from Halloween in Waikiki. Gotta get some sleep for work tomorrow but I posted a few photos. If I gave you one of my cards, please check back again in about a week or so.

Here’s the link to the full set on Flickr

Hallowbaloo 2012

Here’s the photos I took from an abbreviated Hallowbaloo street party courtesy of a tsunami evacuation. Luckily the tsunami did not do not any significant damage (as of this writing at least).

Hallowbaloo 2012 Hallowbaloo 2012 Hallowbaloo 2012 Hallowbaloo 2012

Here’s the full Hallowbaloo 2012 photo set