
A local makerspace group, HICapacity held a night photography meetup at Mokuleia on Friday. There’s really only one really good spot for stargazing on Oahu and that’s at the end of Farrington Highway in Mokuleia. There’s so much light pollution in town and even in central Oahu, that you have to go to the farthest part of the north shore to get away from it. I shot a time lapse video of the total lunar eclipse in 2011 from this spot.
Here are a few advanced tips that go a long way to make a good photo of the night time sky.
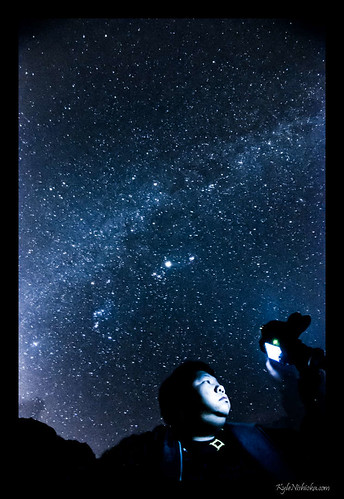
- Beyond the obvious tip of getting a tripod, get low to the ground. This will minimize shaking from the wind and it will let you get a bit more of the ground in the frame even when you are angling your lens upwards. A bean bag (or stuffing your camera bag) will support your camera well enough for the kind of shot you see above. Remember, you want some kind of foreground element to be in your shot to give the picture some context of scale.
- Shoot a test frame at the highest ISO that is available on your camera. Then back it down to a noise level you are comfortable with. You should already be shooting with the widest aperture and a very long shutter. Most people will think that they should keep the ISO low to enhance image quality, but the reality is that you will need every bit of light sensitivity from your camera to capture starlight. The photo above was shot at ISO 6400 and I needed every bit of it.
- Learn how to operate your camera in the dark. Memorize the location of all the buttons that you need to adjust the exposure. You should also learn how to focus manually, using live view and maximizing the digital zoom of the live view. You want to focus on the stars and get them as sharp as you can.
- If you use light painting to show your foreground, you only need to illuminate it for a fraction of the amount of time as the sky. But make sure your foreground doesn’t move even after you turn off the light. In the photo above, I used the LCD backlight from my camera to illuminate me. But I only had the screen on for 5 seconds out of the 30 second exposure. And I still had to hold still after the light went off, otherwise I would be somewhat transparent and the stars directly behind where I’m sitting would start to show through me.
- I have some plastic life bracelets and stretched them over the zoom rings on some of my lenses. This is so that I can tell by feel whether I’m touching the focus or zoom rings. The rings on some lenses don’t feel that different from each other when you only use your fingertips. You may dismiss this because you think that you will be able to tell just by holding the lens. But, remember that your camera is on a tripod and not in your hands. You will probably be reaching over the camera or from the side. And you can’t see the lens barrel because it’s dark. When you spend a lot of effort composing, focusing and tweaking everything manually, you really don’t want to mess things up by turning the wrong ring.
So now that you’ve got some additional tools under your belt, check out Dark Sky Finder to find the best viewing area in your neighborhood and plan your next nightscape outing.