Aloha Tower Fireworks 2013

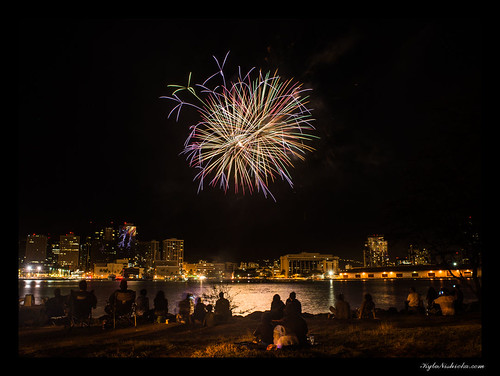
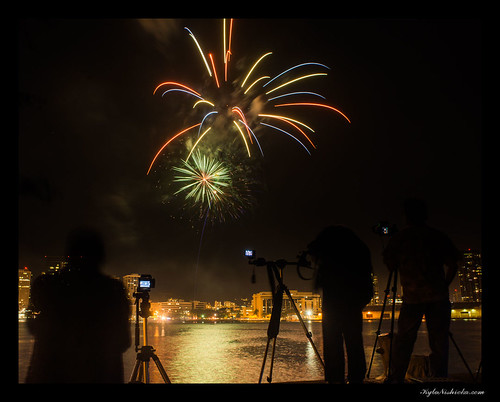
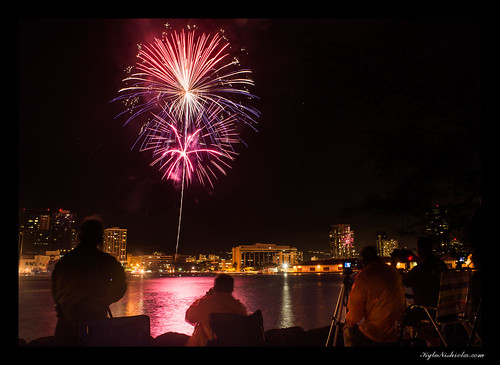
The show was short and sweet this year. I’m glad I shot this from Sand Island since they launched the rockets from the Aloha Tower parking lot.

Aloha Tower 4th of July Fireworks 2013

Aloha Tower 4th of July Fireworks 2013

Aloha Tower 4th of July Fireworks 2013

Aloha Tower 4th of July Fireworks 2013

Halona Blowhole Sunrise

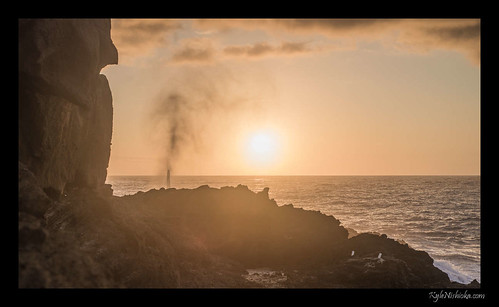
Got up way too early this Saturday for a photo shoot with some friends at Halona Blowhole. Luckily the weather cooperated and I got a lovely shot of the blowhole against the sunrise.

Blowhole Sunrise

Photographing Fire Dancers – Part 2

Hawaii Fire Artists - Practice 2013-01-31

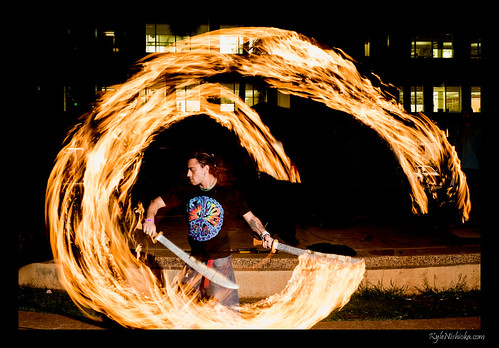
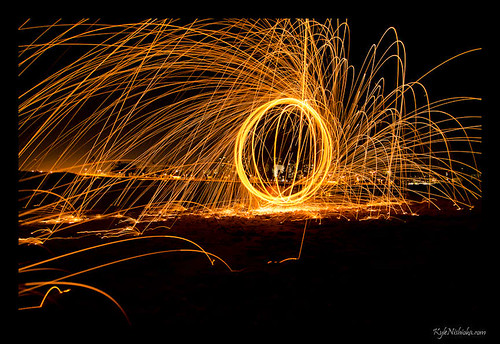
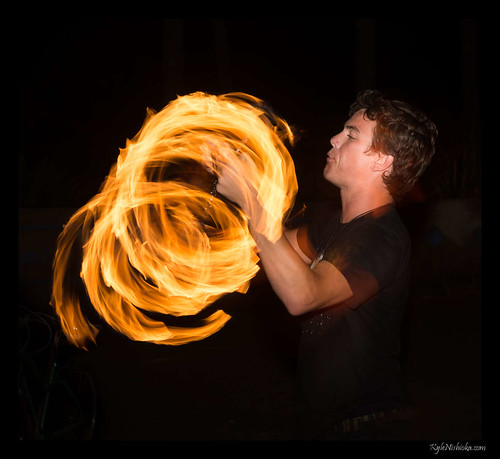
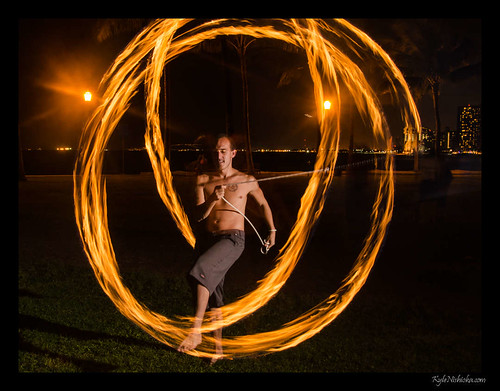
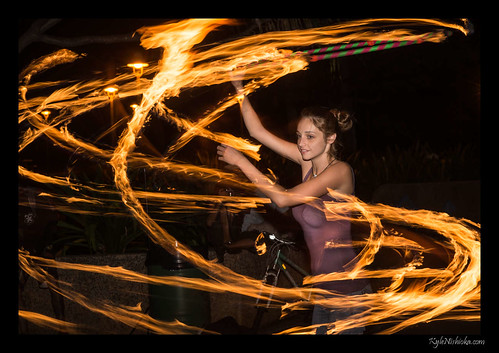
Following up on the basic tips from Part 1, the tricks to making fire photographs involve a fair amount of knowledge of fire dancing itself.

Starting with safety, you the photographer have to be aware of how close you can get to the performers. Professional fire artists will mark their performance area with a Do Not Cross line that is usually a strip of warning tape or a row of traffic cones. Then there is another restricted area where they keep their fuel and do all of their preparations. If there’s no security people watching the crowd, you have to be aware of these boundaries because the fire safety staff are watching the performers waiting to intercept that stray fireball from hitting the either the fuel or the public. When you get too close…and you will…just back away and reset for the next shot.

It also helps to know what kind of fuel the performers are working with because that will affect your exposure settings. The most common fuel is “white gas” or Coleman’s camping fuel. It is very bright, burns without much smoke, and makes the usual yellow-orange fire you expect to see from a camp fire. Less common is lamp oil, which also burns pretty brightly, but makes a lot more smoke and burns longer than white gas does. And even less common is any high-proof alcohol solution. Alcohol burns less brightly compared to white gas and burns out quicker too. I hear burners joke about using unleaded gasoline in the “old days” but I don’t really expect to see anyone use that anymore.

Next you should learn what props or tools the artists use. Here are the ones I see most often:

    Kakaako Fire Jam

  1. Poi Balls. Fire spinning uses wicks on the end of a chain. The lengths of rope / chain are fairly short, about 2′ or less. Spinning poi is mostly close to the body of the artist and the glow from the fire will cause ghosting in your image. Poi spinners will often spin the poi right across or in front of their face. In a long exposure, if the fire crosses in front of the face of the performer the image in almost certainly unusable. The fire is too bright and obscures the face. I often stand to the side of the performer to get a clear shot of their face and the fire. But if you want to get a cool shot of the fire trail, you have to stand directly in front of the performer and just hope that the performer’s face will be in a clear spot when you trigger the flash.
  2. Sans Souci State Park - Hoopers and Fire Dancers

  3. Rope Dart. A wick on the end of a rope of varying length. The artist whips the wick around a lot and makes the biggest patterns I’ve seen. There’s often a lot of space within the pattern to get a clean photo of the artist. Of all the tools, the rope dart is the one I think should look best on video. The fire trails captured in a long exposure do not the artist justice since most of their performance will not be captured by the still image.
  4. Kakaako Fire Jam

  5. Staff. Sometimes one big staff or two smaller batons. Wicks at both ends of the staff or baton. Fire artists love to throw these staffs and catch them in the air. The wicks on staffs are also one of the largest found on any tools and artists like to spin these staffs faster than the typical poi ball or hula hoop. Consequently the fire coming from a staff will be brighter than pretty much anything else. You may want to stop down to the smallest aperture of your lens when the staff spinner first comes on stage.
  6. Kakaako Fire Jam

  7. Hoop. With four or six wicks on the hoop, these hula hoops are the most eye-catching of the fire artists’ tools. The hoop artist is rather difficult to photograph. The fire obscures the artist so easily that the good photos of fire hooping tend to have shorter trails and shorter exposures.
  8. Kakaako Fire Jam

  9. Fire Fingers. Long dowels with wicks at the tips. Looks a bit like Freddy Krueger’s hardware but less menacing…until they are lit up. They really are extensions of the artist’s hands and the patterns they make are like painted brush strokes. Anticipate when the artist will draw something and the camera becomes the canvas.
  10. That’s enough for now. Next time I’ll go into how to make the photo.

Mokuleia Star Trails

Star trails are more fun than time lapse photography in my opinion. Mostly because I like to show the effect of time passing in a single frame. There is something about long exposures and capturing a pattern. When images are strung together into a time lapse video it is easy to appreciate the motion, but it is just as easy to forget it a second later. Here are a few tips To make a memorable star trail photo.

Mokuleia Star Trails

Mokuleia Star Trails 2

    Basic Tips

  1. All of the tips from Night Photography apply to shooting star trails.
  2. When choosing your spot to shoot star trails, you want to have as little light pollution as possible. But, it is not really practical to go far enough away from civilization to eliminate all light pollution. You will inevitably get some glow from a city somewhere on the horizon. Don’t worry so much about that, just concentrate on how many stars you can see with your naked eye. If you can see the milky haze of the Milky Way, your view is more than good enough for star trails.
  3. Shoot your star trails during or around the nights of a new moon. Moonlight is basically light pollution and there’s no where you can go to get away from this source of light pollution.
  4. Wider is better. Capture as large of a pattern as you can with a wide angle lens. Fisheye lenses are especially trippy for these type of photos since you are primarily angling the lens upwards. The distortion enhances the trails.
  5. The north star (Polaris) is practically stationary in star trails since it is almost perfectly aligned with the rotational axis of the Earth. The other stars loop around Polaris and you can use that to your advantage when composing your shot.
  6. Invest in a camera body that has a built-in intervalometer. Or get a remote trigger that has one. And yes, the cheap Chinese ones on Ebay are good enough. One way or another the camera should be set to take the shots on auto-pilot.
  7. Mokuleia Star Trails 3

      Advanced Tips

    1. Cloud cover. So long as passing clouds keep moving through your frame they don’t ruin your star trails photo. Or not as much as you might fear when you are out in the field. The long exposure needed to capture star light thins out the clouds and you still have a largely useful frame. Now if the whole sky stays cloudy, your outing is pretty much a lost cause, but don’t give up after the first big wave of clouds pass by. Now this star trail above had only one thick set of clouds that concerned me. It rolled right through the scene and it looks like a solid cloud bank, but that is just the stitching process smudging the cloud across the frame.
    2. Move and recompose after you’ve gotten about 50 – 75 shots. I know it would be epic to shoot a single sequence spanning the whole night. Then stitch the photos together to make some really long trails. But, if you can’t make this kind of a trip every night, you should make the most of your time by shooting just enough frames to make a decent size trail then move on to the next scene.
    3. The star trails should be the background of your photo, not the subject. If you can find an awesome landscape (or nightscape) that has star trails in it, that will be at least a dozen times better than pointing a lens straight up at the stars.
    4. Learn to focus manually, in the dark, and possibly without live view. You may have heard of the trick where you focus using live view and magnifying the image on the LCD to dial in your focus. But, if the stars are faint, you won’t see them well enough to focus even with live view. Instead look on your lens’s focus ring and find the mark for infinity. Use that as a starting point to fine tune focus if the stars are bright enough to show up on live view.
    5. Be mindful of the wind and the vibration it can cause on your camera & tripod. The lower your camera is to the ground, the better your shots will come out. That, and you can sit on the ground and look through the viewfinder to compose your pics. It’s better than crouching if you had set up the tripod to your standing eye level.
    6. A lot of the finishing touches, not to mention the star trail stacking, is done in post production. Edit your photos before running them through the star trail stacking software. Adjust your exposure, noise reduction, contrast and sharpening prior to processing the star trails.
    7. Once you have the stacked star trails, take the photo back into Photoshop and do some more cleanup. You may possibly want to use just one of the foreground shots from the series to replace the blended foreground that came out of the star trails stack. Composite the foreground on top of the trails and mask away whatever you don’t want to see.

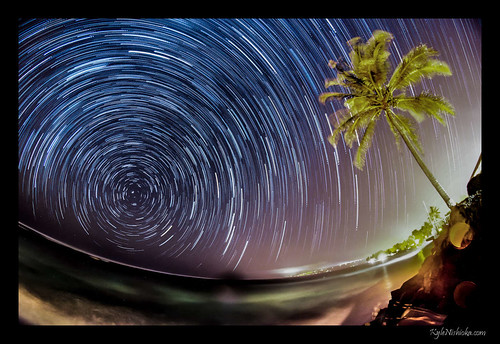
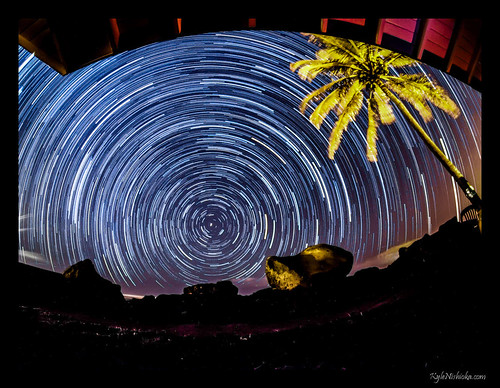
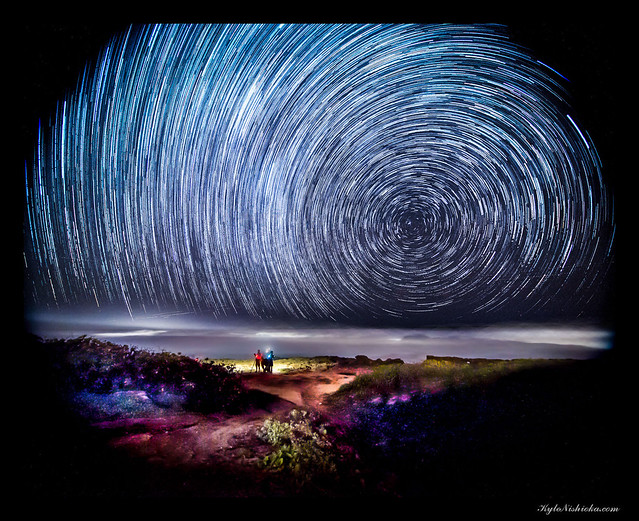
    One last part I almost forgot to mention. The software I used to create the star trails is StarStaX and Startrails. Either of these programs will automatically stack your photos and create the star trails. They are both free programs and do not need Photoshop or any other image editing software to run. StarStaX is cross platform and runs on Windows, Mac & Linux. StarTrails is Windows only.

Night Photography with HICapacity

A local makerspace group, HICapacity held a night photography meetup at Mokuleia on Friday. There’s really only one really good spot for stargazing on Oahu and that’s at the end of Farrington Highway in Mokuleia. There’s so much light pollution in town and even in central Oahu, that you have to go to the farthest part of the north shore to get away from it. I shot a time lapse video of the total lunar eclipse in 2011 from this spot.

HiCapacity Night Photography meetup

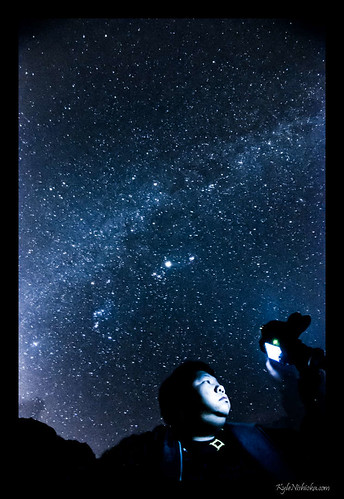
Here are a few advanced tips that go a long way to make a good photo of the night time sky.

  1. Beyond the obvious tip of getting a tripod, get low to the ground. This will minimize shaking from the wind and it will let you get a bit more of the ground in the frame even when you are angling your lens upwards. A bean bag (or stuffing your camera bag) will support your camera well enough for the kind of shot you see above. Remember, you want some kind of foreground element to be in your shot to give the picture some context of scale.
  2. Shoot a test frame at the highest ISO that is available on your camera. Then back it down to a noise level you are comfortable with. You should already be shooting with the widest aperture and a very long shutter. Most people will think that they should keep the ISO low to enhance image quality, but the reality is that you will need every bit of light sensitivity from your camera to capture starlight. The photo above was shot at ISO 6400 and I needed every bit of it.
  3. Learn how to operate your camera in the dark. Memorize the location of all the buttons that you need to adjust the exposure. You should also learn how to focus manually, using live view and maximizing the digital zoom of the live view. You want to focus on the stars and get them as sharp as you can.
  4. If you use light painting to show your foreground, you only need to illuminate it for a fraction of the amount of time as the sky. But make sure your foreground doesn’t move even after you turn off the light. In the photo above, I used the LCD backlight from my camera to illuminate me. But I only had the screen on for 5 seconds out of the 30 second exposure. And I still had to hold still after the light went off, otherwise I would be somewhat transparent and the stars directly behind where I’m sitting would start to show through me.
  5. I have some plastic life bracelets and stretched them over the zoom rings on some of my lenses. This is so that I can tell by feel whether I’m touching the focus or zoom rings. The rings on some lenses don’t feel that different from each other when you only use your fingertips. You may dismiss this because you think that you will be able to tell just by holding the lens. But, remember that your camera is on a tripod and not in your hands. You will probably be reaching over the camera or from the side. And you can’t see the lens barrel because it’s dark. When you spend a lot of effort composing, focusing and tweaking everything manually, you really don’t want to mess things up by turning the wrong ring.

So now that you’ve got some additional tools under your belt, check out Dark Sky Finder to find the best viewing area in your neighborhood and plan your next nightscape outing.

Light Painting with LED Hoops

In case you haven’t been keeping up with retro trends, hooping has been making a comeback. Both guys and girls have been picking up PVC tubing and shaping them to their will. Sometimes they add a bit flare to their hoops with strings of LED lights and a controller chip to make them blink and change colors. These hoops can be used to paint with light when shot as a long exposure.

New Year's Eve 2012

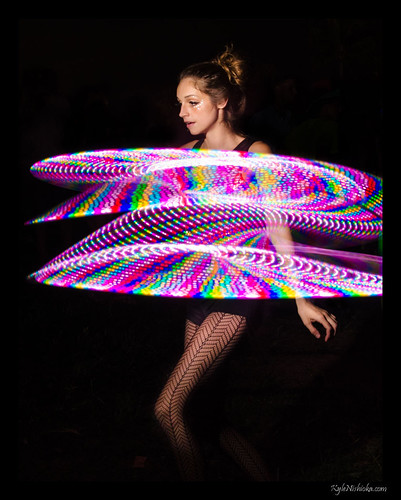
There are a few things that you need to know to get a good light-painted photos.

1. LEDs are relatively dim by photography lighting standards. In dark conditions, they stand out pretty well, but they don’t light up the subject in any meaningful way. The LED hoop in the photo above was especially bright. I’d guess it is roughly 1 – 2 stops brighter than the other hoops I’ve photographed. Even so, the subject is lit by a SB-900 from camera left. And notice that you can’t see any ghosting of the subject from the LED lights.

2. To balance the light between LEDs and flash, meter your exposure for the LEDs and add fill flash to light the subject. You only want to add a kiss of light for fill.

3. Generally you do not want to spill light on the background so keep the power level pretty low, take the flash off of the camera and move it close to the subject. If you have a snoot or grid, that will work even better to minimize the spill.

4. Use bulb mode w/ rear curtain (or 2nd curtain) sync to control the start and stop of the capture. It doesn’t really matter when you start the exposure, but you will want to close the shutter before the hoop has made too many revolutions. Rear curtain sync captures the subject at the end of their move.

Above all else, the thing to remember is that the photo should be about the hooper and not the hoop. Try to time the capture so that their face is not obscured by light trails. But don’t let that stop you from experimenting or letting the hooper show off their moves.

Lightroom Catalog Troubleshooting

I’ve been using Adobe Lightroom since version 2 and I’ve had it crash on me maybe a hundred times over the years. Most of the time it is some kind of glitch and I pickup where I left off. On rarer occasions, Lightroom locks up while in the middle of opening a catalog. I’ve been able to troubleshoot those problems with a little bit of Google-fu. Today’s crash was the most frustrating one to date. None of the usual tricks worked and I was about to give up and pull out a backup catalog. Except that the backup catalog wouldn’t load either. Neither would the previous backup, nor the one before that.

So, obviously there is a whole lot wrong. Here’s how I ultimately fixed it.

1. Delete the Preferences file (*.agprefs) that is stored in %APPDATA%\Roaming\Adobe\Lightroom\Preferences. You could simply rename the .agprefs file, but I’ve never come back to a corrupted one. The .agprefs file contains some Preferences info and most importantly it contains the location of the most recently used catalog. If you run Lightroom like most people, LIghtroom will open the most recent catalog you’ve previously opened. You need to get Lightroom to start in a blank state where it does not try to open a catalog automatically. Deleting the .agprefs file will do this. And don’t worry, a fresh and clean .agprefs file will be created once you’ve gotten Lightroom working again.

2. Delete the ***Previews.lrdata folder and find a backup catalog to restore. I use Crashplan as my general safety net that saves my bacon when a hard drive crashes (and that’s happened once already). But I find that Crashplan is not always the easiest to use when I just want to restore a single file or folder. So, I store my catalog file in my Dropbox folder, as do the current batch of photos I’m working on. When Lightroom craps out, I restore a previous version of the catalog file thru Dropbox’s version history. Usually the version from the day before the crash is good enough. Hopefully, you have some sort of continuous backup solution protecting your catalog and photos too. If I had to rely on Lightroom’s built-in weekly backup feature, I’d be screwed. Deleting the Previews.lrdata folder was the key to recovering from my latest Lightroom mess. And I suppose it would be a best practice to delete those preview files anyway since eliminating the previews makes a catalog load faster. The previews will be regenerated after the catalog has been restored.

3. Launch Lightroom. It should prompt you for a catalog to load.

Lightroom prompts you to select a catalog after you've deleted the Preferences file
Lightroom prompts you to select a catalog after you’ve deleted the Preferences file

4. Select the backup catalog and verify its integrity.

Lightroom catalog selection
Make sure the integrity check option is on.

5. Lightroom should now open the catalog without any problems, assuming that the catalog passes the integrity check.

Here’s the setting under Edit –> Preferences where you can make Lightroom open without loading the most recent catalog.

Lightroom configuration that allows you to pick which catalog to open on each launch of Lightroom

Oh, and one more thing you might want to consider. If you save your RAW images in DNG format, you can save your Lightroom edits and tagging directly in the DNG file. The function is under Metadata –> Update DNG Preview & Metadata. This way, even if the catalog file is totally unrecoverable, you can still salvage all of your editing and metadata. You can simply import the photos into a new catalog and pickup where you left off from there.

Save edits and metadata directly to the DNG file